Showing posts with label Html. Show all posts

Tuesday, 14 May 2013

A shell/dos style input in HTML


A return to text input.
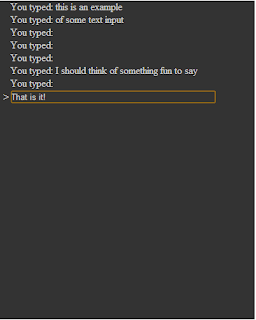
It could be said I have had a little bit of a hobby in attempting to get a satisfying command line input for text entry for a html page. This is probably quite simple for some one with more html/css/jquery skills than me.

The history of this is at some point in the past I wanted to create a very simple web based text adventure. Just for fun. I think I spent more time working on the text input than I did on any other component.

I think I have arrived at a fairly minimal solution that works on Firefox, chrome and IE9 (and probably above). It is very simple and that make me happy.

Ok lets loot at the html code for it

<!doctype html>
<html>
  <head>
    <script src='jquery-2.0.0.min.js' ></script>
    <script src='main.js' ></script>
    <style>
      .main-area {
        width:25em;
        height:500px;
        background-color:#333;
        color:#ccc;
        margin: auto;
        overflow-y:hidden;

      }
      .main-area .line {
        margin-left:1em;
      }
      .main-area .input {
        margin-left:0.3em;
        margin-bottom:0.1em;
      }
      .main-area .input div {
        display:inline;
      }
      .main-area .input .prompt {
        width:1em;
      }
      .main-area .input input {
        background-color:#333;
        color:#ccc;
        border:none;
        width:24em;
      }
    </style>
  </head>
  <body>
    <div class='main-area'>
      <div class='input' > <div class='prompt'>&gt</div> <div class='input-area'><input type=text></input></div> </div>
    </div>    
  </body>
</html>

I am using JQuery 2, you can probably use an earlier version but I have not tested it.

In a real application you tend to not inline your css but I was just playing so found it easier. Most of the css is just setting up some colors and nice margins along with getting stuff centered on the page.

The actual html just specifies a main-area where the text will be output and inside that the input area, the bit where you type.

The input area just has a > symbol to hint this is where you type and a text input box.

We power this very simple html code using Coffeescript. Here it is.

# Coffee file

# Handles user input
class TextInput
  constructor: (@callback) ->
    @input = $('.main-area .input input')
    @focus()
    scrollToBottom()
    @input.keydown (evt) =>
      if evt.keyCode == 13 #return pressed
        callback @input.val()
        @input.val("")

  focus: () ->
    @input.focus()

scrollToBottom = () ->
  $(".main-area").animate({ scrollTop: $('.main-area')[0].scrollHeight}, 1000)

$ ->
  echo = (enteredText) ->
    output = "
You typed: #{enteredText}
" $('.main-area .input').before output scrollToBottom() input = new TextInput(echo) # Refocus if user click on play area. $('.main-area').click () => input.focus()


About 30 lines including comments. The TextInput class monitors your keystrokes on the input line and calls a callback when you press return. My example callback just adds a line the text output and triggers a scroll to the bottom of the dislay area. This is important to keep the text input line shown.

Finally whenever the user clicks in the main-area the text input gets focus. This makes it look more like a single window like a shell/dos prompt and is handled in the last two lines of code.

I quite like this solution mostly because it is very simple and I really like simple. It does keep on adding elements into the main-area div tag so if you spent all week typing away in it it would use a lot of memory. Remove the first div tag  contain a line when you add a new line if you have say over 200 of them is pretty simple.

There are no scroll bars and that may be a show killer. I am pretty sure something like iscroll would sort you out here.

Finally some people prefer to keep the text input at the bottom of the main-area. I kind of like it moving down the screen as it fills with input but my views change from week to week.

Hopefully you might find this useful.

Thursday, 8 November 2012

A Simple Html Input For Text Adventures

A while back I was messing around attempting to get a simple HTML interface for a text adventure. You know the ones where you type in you input. These games have not really been in favour for quite some time and given they require text input nor are they going to be reinvented for mobile devices like pick your own adventures have been.

Still I find them fun to play from time to time. Perhaps one days I will get round to actually writing more than a toy one. In this entry I am just going to present a simple html interface for such game.

I initially attempted to use iscroll to provide some nice scrolling but hit problems when moving the input bar into the scroll area I just could not get it accept input so eventually I have settled on JScrollPane. As I am using JQuery anyway it was not really much of an issue to install this plug in.

The basic idea is to have an HTML unordered list to represent the game. The last list item is the input area. As the player enters commands the response can be displayed as a list element that we insert. We automatically scroll to the bottom after each response.

Lets start with the html code

<html>
  <head>
    <link rel="stylesheet" href="jquery.jscrollpane.css" type="text/css" media="screen" />
    <link rel="stylesheet" href="style.css" type="text/css" media="screen" />
    <script type="text/javascript" src="jquery-1.8.2.min.js"></script>
    <script type="text/javascript" src="jquery.mousewheel.js"></script>
    <script type="text/javascript" src="jquery.jscrollpane.min.js"></script>
    <script type="text/javascript" src="main.js"></script>
  </head>
  <body>
    <div id="container">
        <ul id="text-items">
          <li id='end-buffer' > <input type="text" id="text-input" name="" value="" /></li>
        </ul>
    </div>
  </body>
</html>

As you can see the html is pretty simple. We just create the container and the unordered list.

Our css file as also pretty simple as I comment on  this later.
#container{
    width:640px;
    margin-left: auto;
    margin-right: auto;
    height:400px;
}

#text-input {
    width:100%;
}

#container li{
   list-style-type:none;
}

Yep, we pretty much just centre up my elements and turn bullet points off for my list elements.

The JavaScript makes use of JQuery and of course JScrollPane a JQuery plug in.
function start(){
  var ti = $('#text-input');
  $('#container').jScrollPane();
  var scrollApi = $('#container').data('jsp');

  ti.on("keyup", function(evt) {
   if(evt.keyCode === 10 || evt.keyCode === 13){
     var li = $("<li/>").text(ti.val());
     $("#end-buffer").before(li);
      
      scrollApi.reinitialise();
      scrollApi.scrollToBottom();
     ti.val("");
   }
  });
};
We attach a callback to out input element to monitor when return is pressed. Create an element that just echoes back your input and then scroll down to the bottom so you can still see the input line. Of course in a real game you would have to do something other than just echo back the result...

You will notice I have not done any styling. The colours are pretty uninspiring and the overall it does not feel polished. A lot of this polish is partially determined by the type of game and partially by your own preferences how you think it should work.

A couple of obvious things is an input history so you can cursor though old commands and probably putting a limit on the maximum number of list items in the output display. Just remove the oldest one when adding a new one and there are more then say 100 list items.

The other thing I am not so keen on it having the text entry at the top when you first start. This may not be much of an issue if you have a back story to push the input down. I was also tempted to blat in a lot of empty list items to force it down the screen.

I could go on about the limitations but this is really on meant to be an example to show how simple it can be to get started.

Comments are welcome.

Tuesday, 6 November 2012

HTML5 Growing A Canvas To Fill The Window

A little while back I played a HTML5 game that included a button just below it to grow the canvas used for the game to fill the window the game is being played in. It is a pretty nice feature. I thought this is probably pretty easy to in something similar using JQuery.

Turns out it is, although I have not clone the features exactly.

First up we need a little html document.
<!DOCTYPE html>
<html>
  <head>
    <script type="text/javascript" src="jquery-1.8.2.min.js"></script>
    <script type="text/javascript" src="main.js"></script>
    <link rel="stylesheet" href="style.css" type="text/css" media="screen" />
  </head>
<body>
  <div class='center-me'>
    <canvas id='my-canvas'></canvas>
  </div>
  <div id='toolbar' class="center-me">
    <button id='click-me'>Grow</button>    
  </div>

</body>
</html>

As you can see it is pretty basic. The layout is a centred canvas with a toolbar containing one button below it. When you click the button the canvas will grow to fill the window but still leave the toolbar visible. Click the button again and the canvas will shrink to its original size. In terms of css here is what we have in our style.css file.
body {
    width:100%;
    overflow:hidden;
    margin:0;
}

.center-me{    
    text-align:center;
}

#my-canvas{
    width:300px;
    height:300px;
    border-width:1px;
    border-style:solid;
}

#click-me {
    margin-bottom:10px;
}
Apart from the centreing bits we have added a little bit of a margin to the button otherwise it seemed to get a little bit cut off when we expand. I am not sure why this is so if anyone has any ideas?

We also turn off scrollbar as the dynamic appearance (when needed) in both chrome and FireFox complicates things some what. An alternative is to always have them visible using overflow-y: scroll; in the css for the html element. That way you could push the tool bar off the screen to gain some vertical space in return for loosing some horizontal space. Depending on your trade-offs one me be preferable to the other.

Finally we are onto the javascript. Here is my main.js file
var start_up = function(){
  var ctx = $('#my-canvas')[0].getContext('2d');

  // draw some random stuff.
  ctx.fillRect(50,50,50,50);
  ctx.fillStyle='#cc3333';
  ctx.fillRect(50,10,80,30);

  var fullWindow = false;

  $('#click-me').on('click', function(){
    var width;
    var height;

    if(fullWindow){
      height= 300;
      width = 300;
    }else{
      width = $(window).width();
      height= $(window).height()-$('#toolbar').outerHeight(true);
    }
    fullWindow = !fullWindow; // toggle the flag.

    $('#my-canvas').animate({
      width:width,
      height:height
    }, 2000);

    $('#click-me').text( fullWindow ? 'Shrink' : 'Grow');
  });
};

$(start_up);
So I dip into my canvas element and draw a few rects. After that we hook up the on click callback for the grow/shrink button such that we animate the size of the canvas. Note the use of outerHeight along with the true flag to get the full height including the margin.

An important thing to note is we are changing the width and height that the canvas is drawn at not the internal dimensions. If you try out my example code you will see the image stretched. This may or may not be what you wanted.

If you are happy to stretch you image it is probable you will want to keep the aspect ratio rather than growing to fill as much space as possible. However if you are taking the approach of want to draw as much of a map as possible then you will probably want to set the width and height of the canvas object once the animation stops.

Perhaps sounds a bit odd if you have not encountered this before but it does make quite a bit of sense when thought on for a while.

Anyway that just about wraps it up.